
Using The ROS2 Demo Container#
A Brief Introduction to Containers#

Diagram showing container in their computer. localhost with ports annotated by their purpose. The container image which is used to make the container. Their browser connecting to the vnc.#
If you are unfamiliar with containers they are essentially light weight virtual machines we can use to easily define and create environments for our programs to run in.
A container image named ros2-demo is provided which has an Ubuntu Linux +
ROS2 environment. A container made using this container image will work on
both Linux and windows.
There are several options for how you can start/stop and connect to your ros2
container.
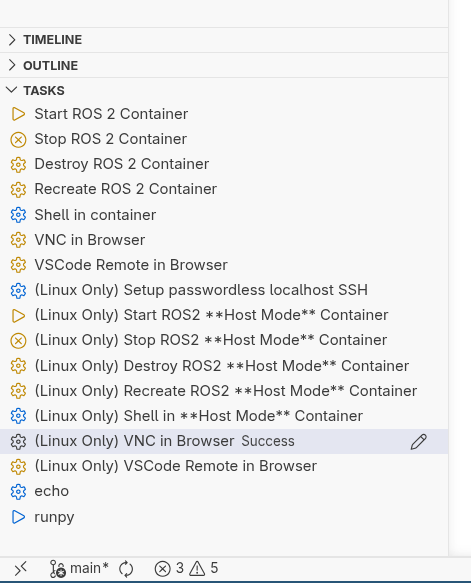
A .vscode/tasks.json file has been placed in the the repo to provide you with
helpful buttons which will appear in VSCode under “TASKS”. See the below
screenshots for details.
Equivalent text shell commands will also be provided. A Makefile for linux users is also available.
Checking System Prerequisites#
To check that all dependendices are correctly installed run the following commands in a text shell:
docker --version
docker compose version
git --version
Expected output:
Docker version 29.5.1, build 2518b52d94
Docker Compose version 5.1.3
git version 2.54.0
Starting the ros2-demo Container#
To start, run the VSC task “Start ROS2 Container” as shown in the picture below. This will pull the prebuilt ros2-demo container image.
A video of the same process:
Equivalently, the following shell commands can be run:
    docker pull n97b2m/ros2-reu-demo:v0.1
    docker compose -f .container/compose.yml up ros2-demo
Getting a Shell in the Container#
Run the task “Shell in container”. This will open a shell in the integrated terminal of VSC. See the above video for this step as well.
TODO: video
Equivalently, the following shell command can be run:
docker exec -it ros2-demo bash
Getting a Graphical Desktop#
The container is running a graphical desktop that can be viewed and controlled “remotely” through a localhost bound VNC connection. Run the task “VNC in Browser”. See video for details.
Equivalently, direct your computer’s browser to:
http://localhost:6081/vnc_auto.html
Try launching a graphical program from a shell not in the VNC and you’ll see it pop up in the VNC viewer, e.g.:
rviz2
Connecting VSC to Container#
It is possible to view and edit files in this repo using the instance of VSC on your computer, but if you do this many of the language features will not be available since the ros2 packages are not present unless “in” the container.
Two options exist for running VSC “in” the ros2-demo container:
Connecting your local VSC instance over SSH to the container (preferred)
As a browser accessble remote code-server
Connecting via SSH to the Container (preferred)#
The container SSH server binds to a localhost port 2223 by default with a user
robot and a password of robot. This won’t be accessible to others on the
network since the container is in “bridge” network mode.
TODO: video
Using the VSC Remote Connection extension connect to
robot@localhost:2223
with the default password robot.
A remote shell into the local container can also be opened by running the following command:
ssh -p 2223 robot@localhost
Connecting via Browser VSC#
Connecting with SSH Into the Container#
– TODO: Video
Running Container in “host” Network Mode#
When running in “host” network mode the ros2 container can control real robots
and see ros2 traffic from other hosts on the network. Possibly works for
windows, someone should check!
Note: In this mode the novnc and ssh server are still restricted to localhost but now at ports 6080 and 2222 respectively.
Default networking=”bridge” localhost Ports:
SSH:
localhost:2223VNC:
localhost:6081VSC-Browser:
localhost:8081
Default networking=”host” localhost Ports:
SSH:
localhost:2222VNC:
localhost:6080VSC-Browser:
localhost:8080
To use this mode run the task “(Linux Only) Start ROS2 Host Mode Container”.
TODO: Video